
This blog is no longer being updated. Thank you for all the love over the years! If you’re looking for a particular recipe scroll to the bottom to find the search bar.
Hey Duggee Stick Badge Biscuits
Anyone who has had a child in the last seven years in the UK will have heard of the genius CBeebies show Hey Duggee. It’s one of those rare kids programmes that is written with the grown-ups in mind too.
The tadpoles that go on a Gap Yaaar, subtle cultural/film references and the infamous Stick Badge episode. The series has even won a BAFTA.
If you haven’t come across Hey Duggee it’s a flat style animation where each episode lasts 7 minutes. Duggee is a big dog and childcare provider for “The Squirrels” and eclectic mix of animals. Each episode they earn a badge. The Stick Badge that aired back in 2017 now has legendary status in particular the Stick Song that the stick & Duggee rave to. You have to see it to believe it.
After watching The Stick Badge for what seemed like the 100th time L decided she wanted to make stick biscuits and this is where this recipe started.

The recipe is based on a slightly different biscuit recipe that uses cream cheese. This makes a very tasty biscuit that can be piped.
Make sure your butter is well softened before you make this recipe as it’ll be far easier to pipe.
If you don’t have a child under 7 a completely different cartoon character is probably coming to mind when you see these biscuits. Ahem.
Hey Duggee Stick Badge Biscuits
Make sure your butter is well softened before making these biscuits. It’ll make it far easier to pipe/
- 100 g butter (well softened)
- 75 g full fat cream cheese
- 100 g caster sugar
- 85 g plain flour
- 15 g cocoa powder
- pretzel sticks
- green sugarpaste
- icing sugar
- edible eyes
- red food colour gel
Cream together the butter and cream cheese until fluffy then beat in the sugar.
Stir in the flour and cocoa powder. The mixture may appear dry at this point, but keep on mixing, it will come together.
When the dough is well combined put in to a piping bag with open star nozzle. To be honest you could do it without the star nozzle but it makes the biscuits look less like something else…
Squidge the dough inside the piping bag to help it warm up and be easier to pipe. Pipe the sticks on to a lined baking tray then gently push the pretzel sticks in to the dough for arms and legs.
Chill the biscuits in the fridge for 30 min. You can leave the chilling stage out, the biscuits will spread more in the oven.
Bake at 180°c (fan) for 15 minute. Allow the baked biscuits to cool on the baking tray for 5 minutes then transfer to a wire rack to cool completely.
When the biscuits are cool you can now start decorating. First mix a small amount of icing sugar with boiling water until you have a thick, sticky icing paste.
Make some leaf shapes with the green sugar paste and stick these on to the stick along with the edible eyes using the icing paste.
Now colour the remaining icing paste red and using a cocktail stick paint a mouth on the sticks.
I get my edible eyes from Sainsbury’s cake baking section. Most supermarkets now sell them
Strawberry Milkshake Birthday Cake
This Strawberry Milkshake Birthday Cake is delicious and easily adaptable for any shaped cake. The sweet pink icing is flavoured with an ingredient you probably already have in the cupboard to give it the authentic milkshake taste.

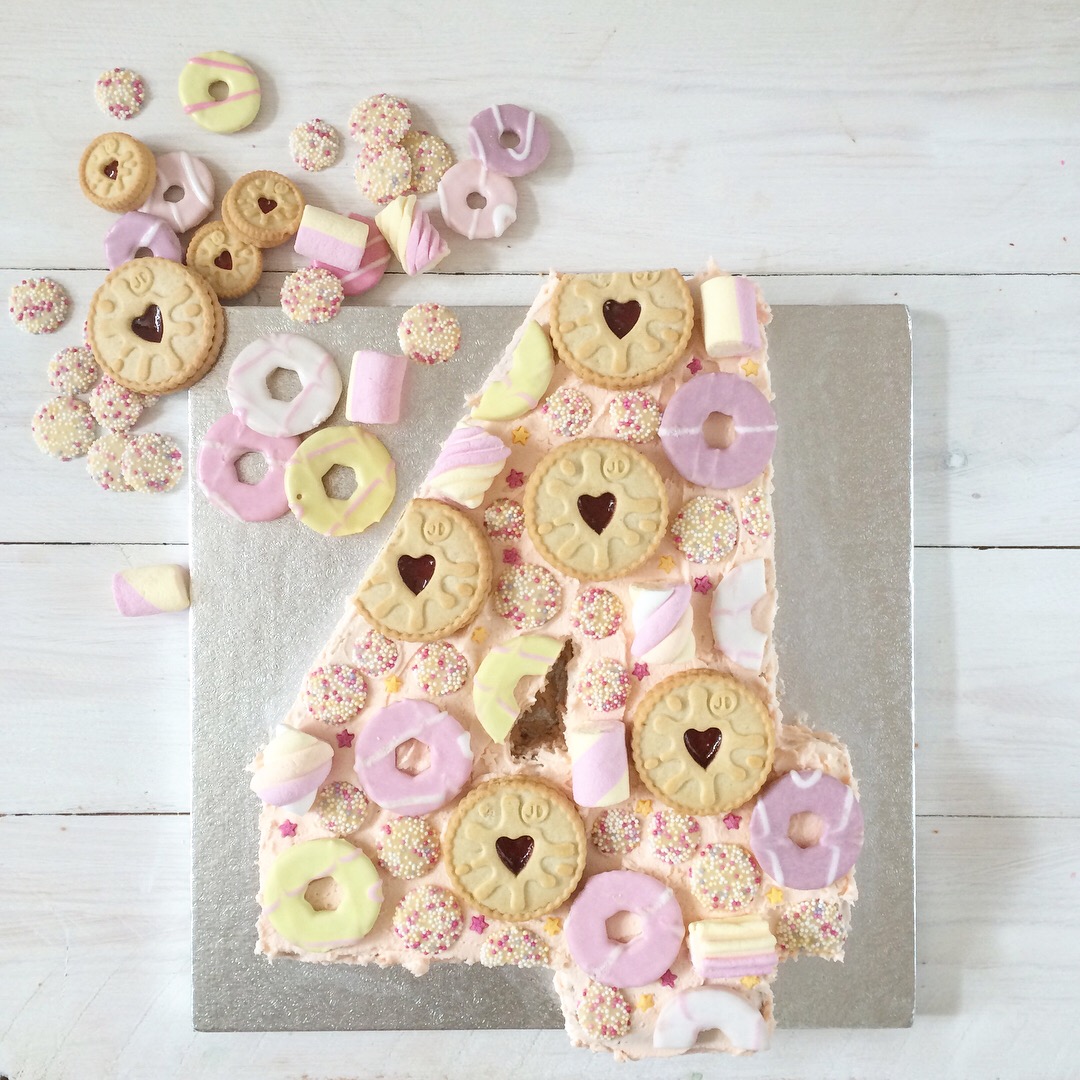
Little Baker (LB) is thankfully still very much in the easy to please stage. Just before her 4th birthday, I asked her what she wanted to for her birthday cake. The reply was a pink number four cake topped with some of her favourite things – biscuits, marshmallows and chocolate. This is how the strawberry milkshake birthday cake was born. Just a bit different from her monkey banana cake request from last year. I was just thankful the reply didn’t feature a My Little Pony or Moana.
Her 4th birthday was also the first time she’s had a proper little party with nursery friends so I decided to make the main cake for blowing out candles with accompanying cupcakes for the kids to take home to save the faff of cake cutting at the end of the party.
We’ll ignore the fact that we nearly forgot to cut the cake at the party. Kid’s birthday parties are stressful for the parents especially when there are parents there from Nursery you don’t really know and in a way want to impress.
I made the cake using a 9-inch square tin and baked it in one go. To make things easier you could bake in a smaller tin and/or bake the layers separately. The method for making the number 4 will still be the same no matter the size of the square cake you start with.
The extra fun for this cake was that it was baked and decorated during the 2018 heatwave. Never before have I been so glad that I wasn’t working with sugarpaste or chocolate. The decorated cake lived in the fridge until it came to serving.
How to make the perfect buttercream
I’ve tried many buttercream recipes over the years and always go back to the tips Holly Bell taught me.
- Always use salted butter as it helps take the sweetness away from the sugar.
- Use the ratio one part butter, 2 parts icing sugar.
- Use an electric food mixer and beat for 7 mins. This will give you lovely white, fluffy buttercream.
- Colour the buttercream with food colour paste rather than liquid. I particularly like Sugarflair paste.
How do I make number-shaped birthday cakes?
This is when I confess Pinterest is your friend. This is the post I’ve used for the last few years. Some numbers are easier than others, but all are created from simple round, square or rectangular tins that you most likely already have at home. No need to buy a new expensive shaped tin.
You can see how I made a number 1 for LB’s rabbit birthday cake.
Can I make banana milkshake icing instead?
You can flavour the icing however you want. Leave it simply vanilla or try other milkshake powders like banana or different flavourings that takes your fancy.
Top tip: don’t try milkshake syrups like the new sugar-free version of Crusha. It is more like a cordial than syrup and doesn’t flavour the icing well.
Top tips:
- Don’t rush making the cake. You can make the sponge in advance and freeze (without the filling)
- You can also make the buttercream in advance too. Put the buttercream in an airtight container in the fridge for up to two weeks. Allow the buttercream to come to room temperature before spreading on the cake.
- The advantage of this cake is that there are lots of discards. Enjoy the “chef perks”, freeze the offcuts for later or make some easy cake truffles.
Strawberry Milkshake Birthday Cake

No fancy tin required, just a square tin and a sharp knife.
The method for making the number four will work with any size square cake. You can also top with any biscuits or sweets that take your fancy.
Cake:
- 360 g butter (softened)
- 360 g caster sugar
- 6 eggs (large)
- 360 g self raising flour
- 1 tbsp vanilla extract
- 1-2 tbsp semi skimmed milk
- 200 g raspberry jam
Strawberry milkshake buttercream:
- 250 g unsalted butter (softened)
- 500 g icing sugar (sifted)
- 2 tbsp strawberry milkshake powder
- 1 tbsp semi skimmed milk
- pink or red food colouring gel (optional)
Topping:
- Selection of biscuits and sweets
First make the cake. In a large bowl beat together the butter and sugar until light and fluffy.
Mix in the eggs one at a time. If the mixture begins to look curdled, add a spoonful of flour.
Add 1-2 tbsp of milk until the cake mixture is of dropping consistency then pour into a 9 inch square baking tin lined with baking parchment.
Bake in a preheated oven at 160°c for 60-75 minutes until the cake is cooked through. If the cake begins to brown too much on the top before cooked through place a piece of foil on the top of the cake.
Once baked remove from the oven and allow to cool in the tin for 10 minutes before turning out on to a wire rack top side down, remove baking paper and allow to cool completely.
While cake is cooling make your buttercream. Put your butter in your mixer and beat until light at fluffy. Gradually beat in the icing sugar a 1/3 at a time to help stop coating your kitchen in icing sugar.
When all the icing sugar has been added finally beat in the milkshake powder and milk. Continue to beat for two more minutes. If you want the icing to be more pink add a tiny amount of food colouring gel.
When cake is completely cool level off if needed with a knife then split in half so you have two layers.
Spread the jam over the bottom layer then place the other layer on top. Cut your cake in to three equal pieces.
The easiest way to construct the 4 is to make a paper template first. Cut a square the same size as your cake then split this piece of paper in to three. Label them 1, 2 & 3.
Piece number 1 will be the horizontal part of the 4. You can leave this piece alone, hurrah!
Piece number 2 is the vertical part of of the 4. Cut the bottom 1/6 off. This will be the foot of the number, let’s call it A.
For piece number 3 you have two options. Get all mathematical or use a cheat/winging it method. I went for the latter. Position 1, 2 and A to form the horizontal and vertical sides of number 4. Take 3 and place it so the top long edge touches top left corner of 1 and top left corner of 2. Using a pencil draw lines where you need to cut, then cut these away and discard. You now have your stencil.
Place these stencils on to your three pieces of cake and cut cake to size. Discard (or eat) any surplus cake. Don’t throw away the templates yet.
Secure the pieces of cake in the shape of a 4 on to your cake board with a small amount of icing.
Using a palette knife coat all sides of the cake with a thin layer of buttercream. Don’t worry if you can see some of the cake through it. Then put cake in the fridge to cool. This is your crumb coat layer that will help keep the crumbs away from your final layer of icing.
While your crumb coat is setting layout your leftover templates in the 4 shape and this this to plan where you’re going to place your sweets and biscuits as the topping.
Coat the cake with the remaining buttercream then place the biscuits and sweets on the top.

Chocolate Nutella Spider Biscuits


The end of October brings Halloween and this is the perfect excuse to twist things in the kitchen. It doesn’t need to be complicated.
The simple sausage wrapped in thin strips of pastry becomes a mummified sausage; chocolate biscuits blended to a powder make convincing edible dirt to accompany marzipan beetles plus a simple pie baked with a finger of pastry and a nail-like flaked almond all of a sudden produces a pie Mrs Lovett would be proud of.
I say we don’t celebrate Halloween here, we don’t dress up, encourage trick or treaters or throw a party, but it’s an excuse to bake something a bit silly then we carve pumpkins for Bonfire Night instead.
These biscuits are a great little baking project for kids to get involved it. You could always substitute the Nutella for peanut butter or jam.
Chocolate Nutella Spider Biscuits

Makes approx 12 spiders
- 225 g butter
- 225 g caster sugar
- 1 egg
- 2 tsp vanilla extract
- 325 g plain flour
- 50 g cocoa powder
- 50 g dark chocolate
- Chocolate strands (or liquorice laces)
- White chocolate chips (for eyes)
- 6 tsp of Nutella (or other chocolate spread)
-
Cream together the butter and sugar until light and fluffy, then mix in the egg and vanilla.
-
Sift in the flour and cocoa, mix until you have dough.
-
Split the dough in half and place one half between two sheets of baking parchment. Roll out until dough is around 4mm thick. Repeat with the other ball of dough, then chill the dough for 30 minutes.
-
Using a 6cm cutter, cut out 24 rounds. Place rounds on a baking sheet lined with baking parchment. Place back in the fridge for another 30 minutes.
-
Preheat the oven to 180°c then bake the biscuits straight from the fridge for 12-15 minutes until cooked through. Transfer to wire rack and leave to cool completely before assembling.
-
Melt the dark chocolate. Using a cocktail stick dip it in chocolate then draw in individual spider legs on baking parchment then allow to set.
-
Take one biscuit and dip in the remaining melting chocolate, then in chocolate strands to coat it. Decorate with two chocolate chips for eyes.
-
Place 1/2 tsp of Nutella in the centre of a plain biscuit and place 8 legs sticking out of the Nutella. Top with a decorated spider biscuit. Gently press together.
Storecupboard Tea Loaf Cake


We are now in to week three of being a school gate parent. L is settling in and making new friends, I’m trying not to be “that” parent on the playground and keeping my profession quiet so I don’t get roped into PTA cake stall baking.
I’m trying to find a new routine for when we get home from the walk back home. Rather than rushing around trying to start on dinner or get other jobs done; sitting down, just the two of us with a cup of something hot for me and something small to eat and drink for L so we can debrief the day.

We all need recipes that can be thrown together. A cake recipe that doesn’t need a quick dash to the shop when the baking urge hits and great for the mid-afternoon slump.
This tea loaf recipe is one of the most common things I bake. It takes a few few minutes to put together, easy for kids to make, it’s healthier(ish) than other cakes, there is only a bowl and spoon to wash up and it keeps really well.
A perfect cake for lunchboxes and snacks throughout the week. A great cake for camping too.

STORECUPBOARD TEA LOAF CAKE

Makes 1x 2lb loaf
- 1 tea bag (Earl Grey is nice, fruit tea bags can work too. Whatever you have to hand)
- 250 ml freshly boiled water
- 400 g dried fruit (whatever you can find in your cupboard. I usually do a mix of sultanas, raisins, citrus peel and the obligatory glace cherries.)
- 80 g soft brown sugar (light or dark, doesn’t really matter)
- 85 g wholemeal self raising flour
- 100 g self raising flour
- 2 tbsp mixed spice
- 2 eggs (beaten)
- In a large bowl pour the boiling water over the tea bag and allow to steep for 5 minutes before adding in the fruit. Cover bowl and ideally leave overnight. If you’re pushed for time put the dried fruit, water and tea bag in a saucepan, bring to the boil then leave for 30 minutes.
- Line a 2lb loaf tin with baking parchment.
- Add the sugar, flours, spices and eggs to the soaked fruit. The mixture is quite wet at this stage, don’t worry.
- Bake at 140°c for 1 1/4 hours, or until a skewer comes out clean. Depending on the mix of fruit I’ve used and how long I’ve soaked it for it can sometimes take a bit longer. Just keep an eye on it. Allow to cool in the tin.
